Backyard TV Setup Under $1000: A Practical Protection Guide
Building a backyard cinema is a common homeowner aspiration, usually sparked by the desire to host summer movie nights, watch fall sports on the patio, or entertain family by the pool. However, when homeowners begin pricing out the project, the enthusiasm often hits a financial wall.
BLUF: Constructing a reliable backyard cinema under $1,000 is entirely achievable, provided homeowners avoid the extremes of buying fragile fabric covers or purchasing heavily overpriced dedicated outdoor televisions. By utilizing a professional IP65-rated polycarbonate enclosure to protect an affordable indoor TV, families can build a much more reliable outdoor TV setup without exceeding a realistic residential budget.
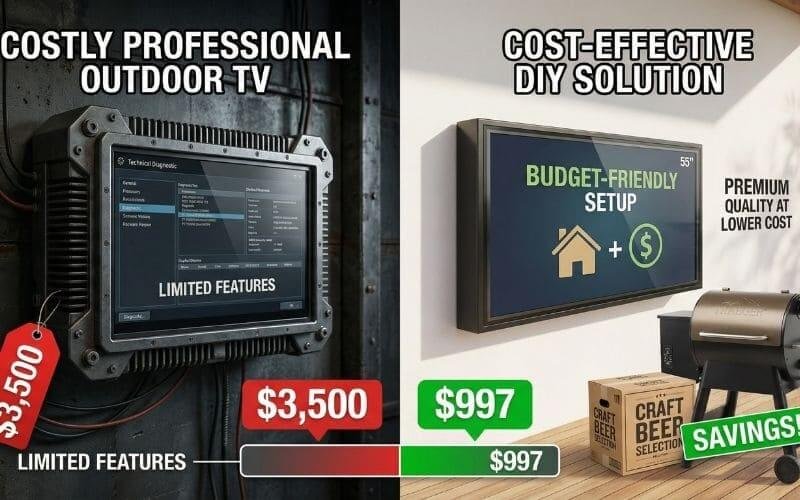
The standard consumer journey usually takes one of two incorrect paths. The first is sticker shock: discovering that a dedicated, all-in-one outdoor television can cost upwards of $3,000 to $5,000. The second path is the dangerous compromise: buying a cheap $300 indoor TV and throwing a $40 nylon fabric cover over it. This inevitably leads to rapid hardware failure from trapped condensation and insect nesting.
As an engineer specializing in outdoor AV protection, I guide commercial integrators and homeowners alike toward a more calculated approach. In this guide, we will break down the exact financial and engineering blueprint to build a safe, long-lasting outdoor entertainment space without breaking the bank.
How we evaluate backyard TV feasibility at Outvion:
Budget allocation efficiency (protecting CapEx vs. OpEx)
Moisture mitigation against morning dew and ambient yard humidity
Impact resistance against stray sports equipment and children’s toys
Safe residential electrical routing and GFCI compliance
Last Updated: Mar 13th. 2026 | Estimated Reading Time: 9 Minutes By Smith Chen, Outdoor TV Enclosure Engineer at Outvion.
The Budget Breakdown: Why Dedicated Outdoor TVs Break the Bank
Dedicated outdoor televisions require a massive initial capital expenditure that blows past a $1,000 budget. The “decoupling strategy” solves this by separating the expensive weatherproof armor from the digital display, keeping the total project cost highly optimized.
To understand how to stay under a $1,000 budget, we must first examine why traditional outdoor AV setups are so expensive and how engineered alternatives solve this problem.
The Financial Flaw of All-In-One Units
Dedicated outdoor televisions are niche, low-volume products manufactured specifically to withstand the elements.
High Initial CapEx: Because the heavy-duty aluminum housing is permanently integrated with the internal display panel, the entire unit carries a premium markup, often starting at $2,500 for entry-level models.
The Fused Hardware Dilemma: The primary drawback of this design is that digital display technology ages rapidly. When the internal screen eventually fails, or when you simply want to upgrade to a better resolution in five years, you cannot just replace the screen. You must discard the expensive weatherproofing armor along with the broken panel and repurchase an entirely new unit.
The Smart Allocation (The Decoupling Strategy)
The engineered alternative is the hardware decoupling strategy. This is the exact method professional integrators use to maximize their budgets, and it translates perfectly to residential backyards.
Separating the Assets: By separating the rugged protective infrastructure (the enclosure) from the digital display (the standard indoor TV), you gain total control over your budget.
Example Budget Allocation:Example budget for a 50–55″ backyard setup using a standard indoor TV and a Basic enclosure. For a 50–55″ setup, Outvion enclosure reference pricing typically starts in the mid-$400s for Basic configurations. If you pair this with a standard, high-brightness 55″ 4K indoor TV (approximately $350) and a heavy-duty wall mount ($80), your total hardware cost sits comfortably around $850 to $900.
Long-Term Savings: When the affordable indoor television eventually reaches the end of its lifespan, you simply unlock the permanent Outvion enclosure and swap in a new screen. Your expensive environmental protection remains bolted to the wall, reducing future replacement costs to a mere fraction of a dedicated outdoor TV.
High (Often requires re-buying the TV every season)
Dedicated Outdoor TV
$2,500 – $4,000+
Integrated sealed chassis
Very High (Replace entire expensive unit upon failure)
Enclosure Strategy
**~$850 – $950**
IP65 Polycarbonate Shell
Low (Replace affordable internal screen only)
Cost comparison between professional outdoor TV and budget-friendly outdoor TV enclosure DIY solution
The Danger of the “Cheap” Route: Fabric Covers and Wood Boxes
Attempting to save money by using soft fabric covers or DIY wooden cabinets fails to address the physics of outdoor environments. These methods trap condensation and encourage insect nesting, creating severe reliability and maintenance risks.
When homeowners realize dedicated outdoor TVs are too expensive, many pivot to the cheapest possible alternatives. Unfortunately, the laws of thermodynamics and biology cannot be circumvented with a nylon sheet or a sheet of plywood.
The Condensation Trap (Fabric Covers)
Soft canvas or nylon fabric covers are often marketed to homeowners as “weatherproof,” but they fundamentally misunderstand the primary threat to outdoor electronics.
The Dew Point: Water damages TVs not just through direct rain, but via high ambient humidity. As backyard temperatures drop overnight, the ambient air reaches its dew point.
Trapped Moisture: A fabric cover draped over a television traps humid air against the cold plastic chassis of the TV. As the temperature drops, this moisture condenses into liquid droplets directly onto the TV’s internal circuit boards.
Corrosion: Because the fabric lacks engineered airflow, this moisture cannot evaporate the next day. It creates a perpetual humid micro-climate that accelerates galvanic corrosion, eventually leading to electrical shorts.
The Biological and Warping Risks (DIY Wood Cabinets)
Building a wooden cabinet around an indoor TV is a popular DIY project, but it introduces distinct engineering failures.
Hygroscopic Material: Wood is a naturally hygroscopic material, meaning it absorbs and releases moisture from the air. Over time, outdoor humidity and rain will cause a DIY wooden box to warp, swell, and separate at the joints, destroying any initial weather sealing.
Biological Beacons: Wood naturally attracts insects. Furthermore, the standby warmth generated by the television’s power supply actively draws local fauna. Wasps, mud daubers, and spiders actively seek out these warm cavities.
The Hardware Risk: These pests can block airflow, contaminate internal components, and increase the risk of electrical failure over time.
An engineered IP65-rated enclosure establishes a rigid, dust-tight boundary that makes insect ingress far more difficult in normal residential operation, while physically isolating the electronics from ambient moisture.
Protecting the Family Investment: Impact and Safety
Backyards are active kinetic environments. Standard display glass easily shatters when struck by sports equipment or toys. Outvion enclosures utilize an optical-grade polycarbonate shield engineered to yield and absorb kinetic energy, protecting the screen and helping prevent dangerous glass shards.
When installing a television on a backyard patio or near a swimming pool, homeowners must engineer solutions that account for the unpredictable kinetic behavior of children, pets, and backyard gatherings.
The Brittleness of Standard Displays
The viewing surface of a standard consumer television is constructed from highly brittle silicate glass or basic rigid plastics.
The Kinetic Threat: When subjected to an unintended impact from a thrown baseball, a stray frisbee, a swinging pool net, or a bumped patio chair, standard glass suffers catastrophic brittle failure.
Safety Liabilities: A shattered screen is not merely a lost hardware investment; it presents an immediate safety hazard requiring a meticulous cleanup protocol to ensure no sharp glass shards remain on the pool deck, grass, or patio where children may walk barefoot.
The Polycarbonate Defense
Outvion enclosures address this specific kinetic risk by utilizing an optical-grade polycarbonate front window.
Material Science: Polycarbonate is an advanced engineering thermoplastic renowned for its extreme impact resistance and structural ductility. In contrast to rigid glass, the molecular structure of polycarbonate allows it to deform elastically under mechanical stress.
The Sacrificial Layer: When struck by a blunt object, the polycarbonate shield acts as a sacrificial protective layer. It flexes inward, absorbs the kinetic energy of the impact, and then rebounds to its original shape.
Risk Reduction: While a severe, direct impact may cause localized scratching on the polycarbonate surface, it resists shattering into dangerous shards. By absorbing the destructive energy, the shield protects the delicate LCD panel housed safely behind it, preserving the hardware and supporting family safety.
Backyard Climate Assessment: Balancing Shade and Airflow
A completely sealed box creates a thermal trap. To prevent component failure, hotter or more sun-exposed patio installations require active fan ventilation sized appropriately for the internal heat load to flush out waste heat.
A sealed IP65 enclosure successfully isolates the display from external moisture and insects, but it introduces a secondary engineering challenge: thermal management. An operational television generates internal waste heat from its power supply and LED backlight array.
The Greenhouse Effect
When an enclosure is installed outdoors, it is also subjected to solar loading (insolation).
Heat Accumulation: The dark surfaces of the enclosure absorb solar radiation, transferring that heat to the internal air volume. The combination of internal component heat and external solar gain creates a greenhouse effect.
Hardware Strain: Without an engineered thermal management strategy, the internal temperature will rapidly exceed the operational threshold of the display, causing display darkening, image distortion, unexpected shutdown, or permanent panel stress.
Evaluating Your Patio Micro-Climate
Before selecting an enclosure configuration, homeowners must evaluate where the TV will be mounted.
Shaded Environments: In shaded, lower-heat installations (such as deep covered patios or locations protected from prolonged direct afternoon sun), lighter-duty configurations may be sufficient.
Sun-Exposed Environments: However, hotter or more sun-exposed sites should favor ventilated Pro or Ultra versions sized for the heat load. Installations located near unshaded pool decks or facing intense, direct afternoon sun generate substantial ambient heat, requiring active thermal management.
Active Airflow Mechanics
To combat elevated thermal loads, operators must utilize active, forced-air ventilation.
The Cooling Mechanism: Ventilated versions use active fan airflow to help remove waste heat from the enclosure cavity, drawing cooler ambient air in and exhausting the heated air out.
Configuration Sizing: In the current Outvion line, ventilated configurations use 2 fans for 28–55″ models and 4 fans for 60″+ models. This air exchange ensures that the internal micro-climate remains stable, mitigating thermal strain and prolonging the life of the enclosed hardware.
Backyard Thermal Management Matrix
Patio Micro-Climate
Solar Exposure Level
Thermal Risk Assessment
Recommended Ventilation Approach
Deep Covered Patio / Gazebo
Minimal direct sunlight
Low Risk
Lighter-duty configurations may be sufficient.
Standard Open Deck / Pergola
Partial afternoon sun
Moderate Risk
Ventilated configurations (2 fans for 28-55″ models).
Unshaded Pool Deck / Direct Sun
Intense, direct radiation
High Risk
Ventilated Pro or Ultra versions (4 fans for 60″+ models).
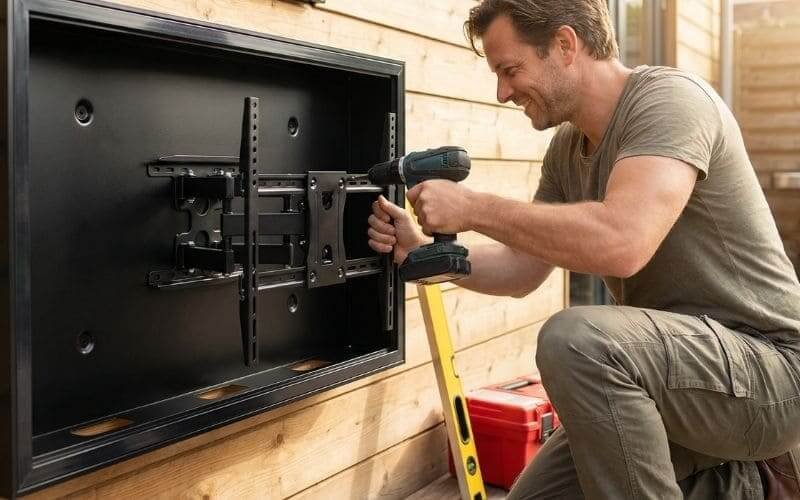
Installing a weatherproof outdoor TV enclosure with VESA mount on a wooden patio wall
Safe Electrical Routing on a Residential Budget
Powering an outdoor TV requires strict adherence to residential safety codes. All outdoor installations must utilize GFCI-protected receptacles, weather-rated “in-use” covers, and properly executed drip loops to prevent water from traveling down cords.
Protecting the television hardware is critical, but protecting your family and your home’s electrical grid is paramount. Using a standard indoor TV outside safely requires competent electrical routing. Running a standard indoor extension cord across the wet grass to power a television is an unacceptable safety risk.
Water and electricity are a lethal combination, especially near swimming pools or sprinkler systems. Any outdoor electrical receptacle used to power a patio TV must be equipped with GFCI protection.
The Mechanism: GFCI devices constantly monitor the current flowing through the hot and neutral wires. If they detect a microscopic imbalance—indicating that current is leaking to ground—the GFCI will instantly cut the power in milliseconds.
Compliance: This critical safety feature helps prevent severe electrical shocks. If your chosen mounting location does not have a GFCI outlet nearby, you should hire a licensed electrician to install one before proceeding with your backyard cinema project.
Implementing the Drip Loop Technique
Water travels down cables via gravity and surface tension.
The Hazard: If a power cord runs straight from the bottom of the TV enclosure directly down into a wall outlet, rainwater will ride that cable like a slide, flowing directly into the electrical socket.
The Solution: Installers must always implement a “Drip Loop.” This requires leaving a slack, U-shaped loop of cable that hangs below the level of the wall outlet (and below the enclosure’s cable exit) before curving back up to plug in. When condensation runs down the cable, gravity forces the water to drip harmlessly off onto the ground at the lowest point of the loop.
In-Use Weather Covers
For an outdoor TV that remains plugged in continuously, standard flat outlet covers are insufficient. You must install a “while-in-use” or “extra-duty” weather cover. This clear or opaque plastic dome closes completely over the cord and the receptacle, maintaining a weatherproof seal even while the thick TV power cord is actively connected.
Audio Solutions for the Open Air
Because the enclosure is sealed against moisture and dust, it naturally dampens the TV’s internal speakers. To achieve clear backyard audio, homeowners should plan to connect an external weather-rated soundbar or outdoor speaker system.
A frequent mistake in DIY backyard cinema projects is neglecting the audio. Standard indoor TVs rely on small, rear-facing or downward-firing speakers that bounce sound off the walls and ceiling of a living room.
The Physics of Outdoor Acoustics
In an open backyard, there are no walls to contain the sound waves. Sound dissipates rapidly into the open air and is easily drowned out by ambient noise.
The Enclosure Effect: Furthermore, because an IP65 enclosure is designed to seal out fluids and prevent dust ingress, it naturally dampens the audio output from the TV’s internal speakers. Relying solely on the enclosed TV speakers will result in muffled, difficult-to-hear dialogue.
The Audio Strategy: To maintain the sub-$1000 budget while ensuring clear audio over the sound of crickets, pool pumps, or neighborhood traffic, allocate approximately $100 to $150 of your budget toward a dedicated outdoor sound system, depending on speaker choice.
Connection Methods: For clearer outdoor audio, plan for an external weather-rated speaker or soundbar during installation. You can utilize the television’s optical audio out, an HDMI ARC connection, or Bluetooth capabilities (if the TV supports it) to route the audio to the external speaker, which can be mounted directly below the enclosure or integrated into your patio structure.
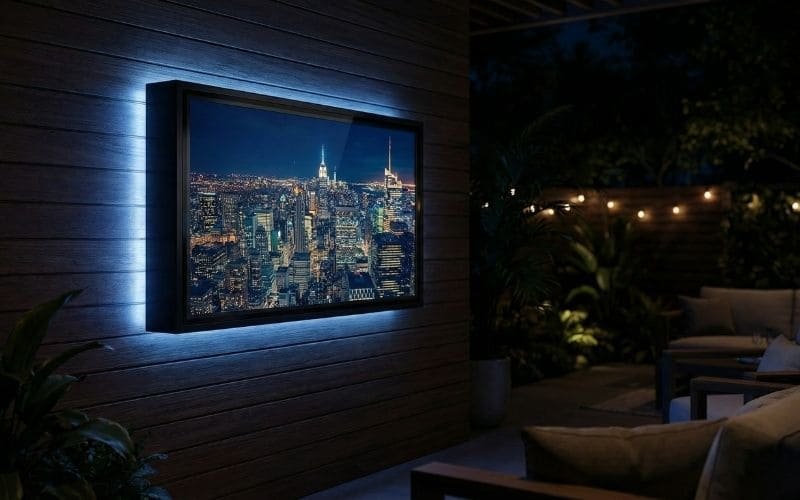
Backlit outdoor TV enclosure displaying city skyline for nighttime patio entertainment
Structural Mounting Safety in the Backyard
Hanging a heavy enclosure safely requires anchoring directly into the structural wooden studs of the house or using proper masonry anchors for brick. Never attempt to mount a TV enclosure solely to drywall, vinyl siding, or thin decorative stone.
The mechanical bond between the wall mount and your home is the single point of failure preventing your investment from crashing to the patio floor.
Anchoring into Wood Studs
When mounting to a wood-framed exterior wall (even if it is covered by siding or stucco), you must anchor directly into the structural studs.
Locating the Studs: Use a high-quality electronic stud finder to locate the exact center of the wooden studs from the outside.
Hardware Selection: Use heavy-duty, exterior-grade stainless steel or hot-dipped galvanized lag bolts (typically 5/16″ diameter and at least 2.5″ to 3″ long). Do not use standard indoor zinc-plated screws, as outdoor humidity will cause them to rust and eventually snap under the shear load of the television.
Avoiding Siding Failures
A common residential mistake is attempting to mount hardware directly to the home’s exterior cladding.
The Danger: Vinyl siding, aluminum siding, and decorative stone veneer provide zero structural support. If you attach a heavy cantilevered TV mount directly to siding, the weight will crush the material and rip the screws out of the wall.
The Solution: The structural load should be carried by the studs, not the siding itself. You must drive long lag bolts completely through the siding and deep into the solid wood behind it to achieve the necessary shear strength.
Backyard Mounting Surface Guidelines
Exterior Siding / Surface
Required Hardware Strategy
Load-Bearing Reliability
Wood / Hardie Board (Into Studs)
Stainless Steel Lag Bolts (5/16″ or larger)
Excellent. Highly stable for heavy cantilevered loads.
Solid Brick / Concrete Patio Wall
Metal Sleeve or Wedge Anchors
Excellent. Highly stable when drilled securely into the brick face.
Vinyl Siding
Long Lag Bolts driven through siding into studs
Variable. The load must rest entirely on the studs, not the vinyl.
Decorative Stone Veneer Only
None
Do not attempt. The veneer will detach from the wall structure.
Conclusion: The $1000 Backyard Reality
Building a high-quality backyard cinema does not require a massive $3,000 to $5,000 investment, nor should it rely on the false economy of cheap fabric covers that guarantee hardware failure. By applying commercial engineering principles to a residential project, families can build a much more reliable outdoor TV setup without exceeding a realistic residential budget.
The decoupling strategy is the key to this financial efficiency. By investing in an engineered IP65-rated physical barrier constructed with optical-grade polycarbonate, you isolate an affordable standard indoor TV from the primary threats of moisture ingress, UV degradation, and kinetic impact.
By matching the ventilation to your patio’s micro-climate, adhering to GFCI electrical safety, and implementing proper structural mounting protocols, you create a permanent, reliable outdoor entertainment space. When the internal screen eventually requires upgrading, your heavy-duty infrastructure remains securely on the wall, ensuring your backyard cinema provides years of safe, reliable entertainment.
Backyard Cinema FAQ
1. Do I need to seal the enclosure with silicone caulking?
No. Engineered enclosures use specialized internal gaskets designed to maintain the seal under mechanical compression. Adding aftermarket silicone to the exterior can block intended drainage pathways, fan openings, air paths, and ventilation components, causing moisture retention and severe overheating.
2. Can I mount the TV enclosure directly to my vinyl siding?
No. Vinyl siding provides zero structural support and will crush under the weight of the mounting bracket and the enclosure. The structural load should be carried by the studs, not the siding itself. You must use a stud finder to locate the structural wooden studs beneath the siding and drive long lag bolts completely through the siding and deep into the solid wood to achieve the necessary shear strength.
3. Will the enclosure protect the TV in freezing winters?
Check the specific TV model’s operating and storage temperature range first. In severe freezing climates, seasonal removal may still be the safer choice for standard indoor TVs. Extreme sub-zero temperatures can cause the liquid crystals in standard displays to become sluggish, freeze, or suffer permanent damage regardless of a standard enclosure.
4. How quickly can I swap the TV if it breaks?
The decoupling strategy allows you to unlock the bezel and swap the internal display with substantially less downtime because the enclosure remains installed on the wall. Actual replacement time depends on TV size, wiring access, and mount type, but it is usually much faster and less expensive than replacing a full all-in-one outdoor TV unit.
Recommended Technical Reading & Resources
To further understand the engineering standards and safety protocols discussed in this guide, we recommend reviewing the following authoritative resources:
The official international standard defining the testing methodologies for evaluating the degree of protection provided by mechanical casings against dust and water.
A technical breakdown explaining the modulus of elasticity and why polycarbonate yields and absorbs kinetic energy, making it the superior choice for high-traffic backyard environments.
Recent Posts
Smith Chen
Outdoor TV Enclosure Engineer at Outvion
Smith Chen is an Outdoor TV Enclosure Engineer at Outvion. He works on enclosure sizing, ventilation planning, mounting compatibility, and application design for patio, bar, poolside, and public-space installations.