
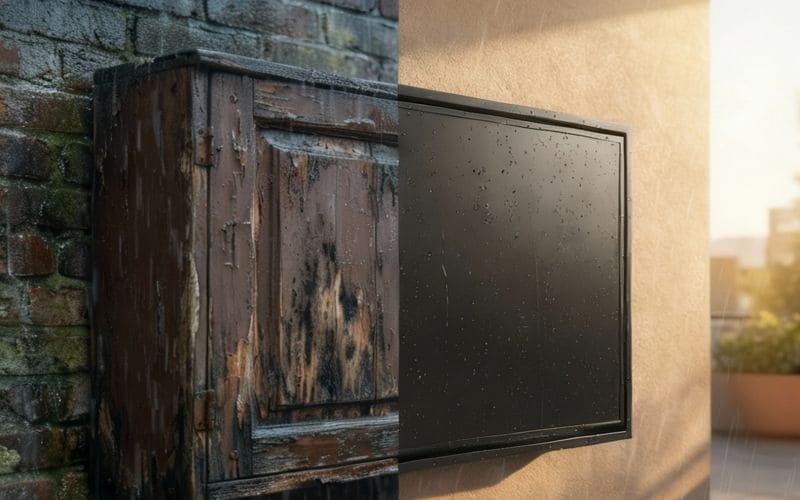
Building your own outdoor TV cabinet seems like a straightforward, budget-friendly weekend project: buy some exterior-grade plywood, a clear plastic sheet, and silicone sealant to save money on your patio upgrade. However, at Outvion, our engineering team regularly hears from customers who took this exact route, only to purchase a professional enclosure a few months later when the summer heat or rainy season destroyed their screens.
Short Answer: Building a DIY wooden TV cabinet frequently results in an overheating hazard and a false sense of weather protection. Wood acts as a thermal insulator that traps a TV’s waste heat, while DIY sealing methods struggle against natural wood expansion and humidity. While materials for a DIY build quickly approach $300-$400, investing in a professional IP65 Polycarbonate Enclosure (like Outvion) provides a streamlined, actively ventilated, and impact-resistant solution designed for a long outdoor service life.
Before you fire up the table saw, let’s review the physical realities of outdoor material performance. In this guide, we break down the thermal dynamics of wood, the truth about screen shields, the actual TCO (Total Cost of Ownership), and exactly when a DIY project might actually make sense for your specific situation.
Last Updated: March 8th. 2026 | Estimated Reading Time: 9 Minutes
The Thermodynamics of Wood: Why Enclosed TVs Overheat
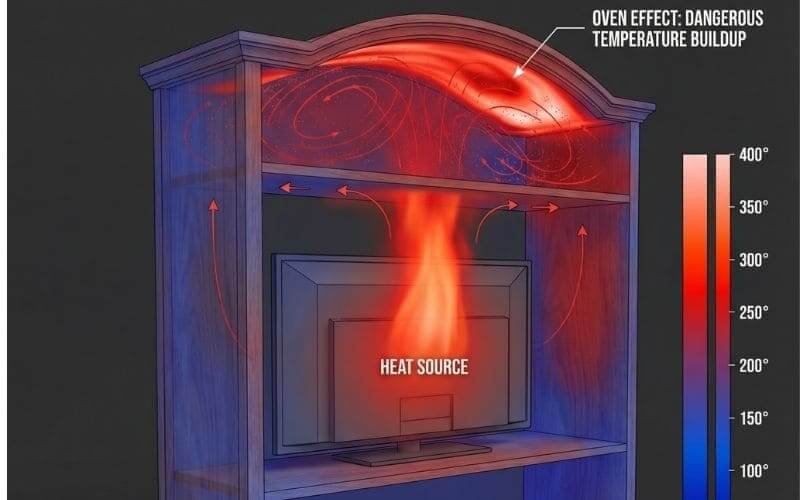
Wood is an exceptional building material, but it is a poor choice for housing electronics because it functions as a strong thermal insulator. Without engineered active airflow, it traps the TV’s operational heat, pushing consumer electronics past their safe operating thresholds.
The most critical engineering challenge when placing high-voltage electronics outdoors is heat management. Every flat-screen television, whether an older LCD or a modern QLED, generates internal waste heat from its power supply unit, processor, and LED backlight array.
The Thermal Insulation Problem
In a climate-controlled living room, a television relies on passive convection. The ambient room temperature (usually around 70°F or 21°C) allows the heat to radiate freely out of the TV’s plastic back panel. When you place that same television inside a thick wooden box, the thermodynamic environment changes drastically.
-
The R-Value of Wood: Wood—whether it is marine-grade plywood, cedar, or MDF—has a relatively high thermal resistance (R-value). It is biologically structured to insulate.
-
The Heat Trap: Unlike metal, which can rapidly conduct heat away, wood absorbs and traps the heat inside the cavity. On a hot summer day, the ambient outdoor temperature combined with the TV’s own generated heat creates a thermal blanket effect inside the sealed wooden box.
The Risk of Thermal Strain on Electronics
Consumer-grade televisions are generally engineered to operate safely within a temperature range of 32°F to 104°F (0°C to 40°C). When trapped inside a wooden enclosure during the summer, the internal temperature can easily exceed these specifications.
-
Component Degradation: Prolonged exposure to excessive heat places immense strain on the power supply board’s capacitors, causing them to dry out and fail prematurely.
-
Display Issues: While industrial displays can withstand extreme temperatures, consumer LCD panels subjected to high heat can experience severe temporary or permanent display anomalies. The heat can cause the liquid crystals to struggle, leading to dark spots, color shifting, or a complete loss of image until the unit cools down.
The Outvion Approach: Active Fan Ventilation
To mitigate heat, DIYers often try to cut holes in their wooden boxes and install basic computer fans. However, balancing airflow with genuine weatherproofing is complex.
-
Engineered Airflow: Rather than relying on the shell material itself to magically dissipate heat, Outvion enclosures are built with an active ventilation architecture.
-
Climate-Specific Options: Recognizing that different environments require different cooling capacities, Outvion offers enclosures with 2 or 4 fan configurations (such as the Basic, Pro, and Ultra versions). For hotter environments, the Pro or Ultra versions provide the necessary active air cycling to push hot air out and draw cooler ambient air in, keeping the TV within a safer operating range (rated for environments from -30°C to +50°C).
Outvion Active Cooling Configurations vs. DIY Passive Wood
| Enclosure Strategy | Cooling Architecture | Recommended Environment | Safe Operating Range Support |
| DIY Wooden Box | Passive (or cheap PC fans) | Deeply shaded, cool climates only | Highly unpredictable (High risk of thermal strain) |
| Outvion (Basic Series) | 2-Fan Active Ventilation | Covered patios, mild to moderate climates | Supports standard operating temps |
| Outvion (Pro / Ultra Series) | 4-Fan High-CFM Active Cycling | Hot environments, direct sun exposure | Engineered for extremes (-30°C to +50°C) |
The Screen Shield: Polycarbonate vs. Acrylic (Plexiglass)
While DIY acrylic (plexiglass) offers good optical clarity and weatherability, it is highly brittle and prone to shattering upon impact. Professional enclosures utilize Polycarbonate for its extreme impact resistance, combined with a 99% UV-blocking layer to protect the television.
When building a DIY cabinet, you need a transparent front window to protect the screen from rain and debris while allowing the picture to be visible. The overwhelming majority of DIY builders purchase acrylic sheets (commonly known by trade names like Plexiglass) from big-box hardware stores.
The Truth About Acrylic
It is a common misconception that all acrylic yellows instantly in the sun. In fact, high-quality acrylic actually possesses excellent natural UV stability and optical clarity. The real danger of using acrylic in an outdoor TV cabinet is not necessarily yellowing; it is structural fragility.
-
The Brittleness Factor: Acrylic is a relatively stiff and brittle polymer. Over time, and especially in colder weather, it becomes even less flexible.
-
The Impact Hazard: An outdoor patio is a dynamic environment. If a stray baseball, a heavy falling tree branch, or a piece of yard equipment strikes an acrylic shield, the material is highly likely to crack or shatter into sharp, dangerous shards, leaving the fragile TV screen behind it completely exposed to the impact.
The Polycarbonate Advantage
Professional outdoor enclosures, including those manufactured by Outvion, generally utilize Polycarbonate (PC) for the front viewing window.
-
Extreme Impact Resistance: Polycarbonate is the same core material used in the manufacturing of police riot shields and protective machine guards. It possesses massive impact resistance compared to acrylic. If a heavy object strikes a polycarbonate shield, the material is designed to flex and absorb the kinetic energy, bouncing the object off without shattering.
-
UV Protection for the TV: While raw polycarbonate is sensitive to UV light, Outvion’s front PC windows are treated with a specialized coating that provides 99% UV blocking. This not only protects the polycarbonate shield itself from degrading but, more importantly, it blocks harmful solar radiation from baking the plastic bezel and the internal components of the television.
Moisture Control: The Reality of DIY Weatherproofing
Sealing a wooden box with silicone is a temporary fix against moisture. Wood’s natural tendency to expand and contract breaks these seals over time. Engineered enclosures rely on IP65-rated designs and sealed cable exits for long-term weather protection.
Water and electricity are a dangerous combination. The primary goal of any outdoor enclosure is to keep rain, morning dew, and humidity away from the television’s internal circuitry.
The Challenge of Sealing Wood
Wood is a hygroscopic material. This means it actively absorbs and releases moisture depending on the relative humidity of the surrounding air.
-
Dimensional Instability: As wood absorbs moisture, it swells. As it dries out, it shrinks. This constant dimensional shifting places incredible mechanical stress on the joints of a DIY cabinet.
-
The Failure of Silicone Caulk: DIY builders typically use silicone caulk to seal the interior joints and the edges around the plexiglass window. While silicone is flexible, the repetitive expansion and contraction of the wood will eventually cause the caulk to tear or pull away from the wood grain.
-
Moisture Intrusion: Once those microscopic gaps form, wind-driven rain and humid morning dew will inevitably find their way inside the cabinet, leading to condensation on the TV’s motherboard.
The Cable Routing Dilemma
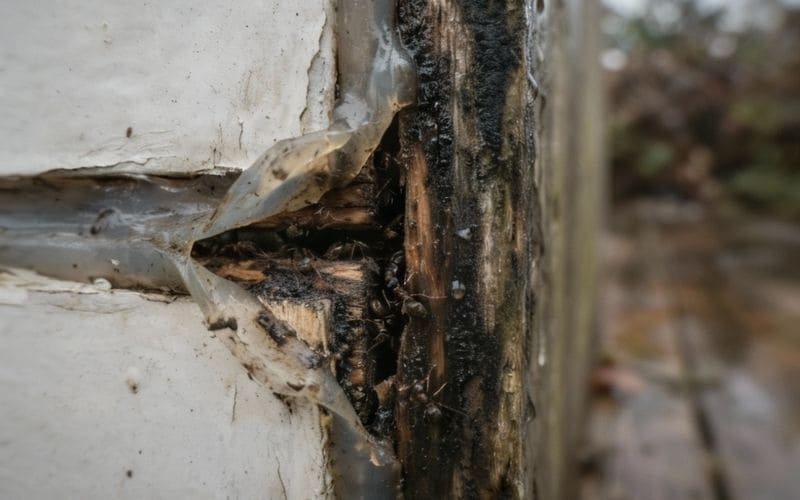
The most common point of water ingress in a DIY build is where the power and HDMI cables exit the box. DIYers usually drill a hole in the bottom or back of the wood. Trying to seal a bundle of moving cables with expanding foam or putty rarely works long-term. Insects, spiders, and moisture often use this poorly sealed hole as a direct entry point.
The Standard of IP65 Protection
Rather than fighting the natural movement of wood, professional enclosures are molded from dimensionally stable polymers that do not warp with humidity.
-
The IP65 Rating: Outvion enclosures are designed to achieve an IP65 rating under proper installation. This standard signifies that the enclosure provides a high level of protection against dust ingress and can withstand low-pressure water jets from any direction.
-
Sealed Cable Exits: Instead of a simple drilled hole, Outvion utilizes a structured, sealed cable exit system at the bottom of the unit. This allows necessary cables to pass through securely while maintaining the integrity of the weatherized shell, drastically reducing the chances of moisture or insects accessing the internal cavity.
When Does a DIY Wooden Cabinet Actually Make Sense?
While professional enclosures offer superior protection, a DIY wooden cabinet can still be a viable option for temporary setups, fully shaded and deeply covered patios, or hobbyists with very strict budgets.
At Outvion, we believe in providing honest assessments. An IP65 polycarbonate enclosure is a premium protective asset, but it is not the only answer for every single scenario. There are specific situations where taking the DIY route and building a wooden cabinet might actually make sense for your specific needs.
1. The Deeply Covered, Fully Shaded Patio
If your outdoor entertainment area is located deep within a screened-in porch, under a massive, fully waterproof pergola, or within a highly protected three-season room, the environmental threats are significantly reduced.
-
If the television will never be exposed to direct sunlight (which mitigates the extreme heat trap effect).
-
If wind-driven rain cannot physically reach the mounting location.
-
In these highly sheltered micro-environments, a well-built wooden cabinet can serve more as a decorative furniture piece to hide the TV when not in use, rather than a primary line of defense against severe weather.
2. Temporary or Seasonal Setups
Are you only planning to have the TV outside for a few weeks in the autumn to watch football, and then you plan to bring the TV back inside the house for the rest of the year?
-
If the setup is strictly seasonal or temporary for a specific event series, investing in a permanent, year-round weatherproof enclosure might be overkill. A basic DIY cabinet might suffice for short-term, fair-weather usage.
3. The Strict Budget and the “Disposable” TV
Sometimes, the budget simply does not allow for a professional enclosure.
-
If you acquired a free, older, or heavily used television from a friend, and you are willing to accept the high probability that it might fail after one or two seasons outdoors.
-
If you are fully prepared to absorb the cost of replacing the TV when the humidity or heat eventually compromises it.
-
In this scenario, a $150 DIY wood build acts as a temporary bandage. You are accepting the risk of hardware failure in exchange for minimizing your upfront capital expenditure.
4. The Passionate Woodworker
For some, the joy is in the building process itself. If you possess advanced carpentry skills, have a workshop full of tools, and genuinely enjoy spending your weekends designing, routing, sealing, and painting custom woodwork, building a TV cabinet is a fun, challenging project. If the aesthetic of custom-stained cedar or mahogany perfectly matches your patio furniture, the labor involved is part of the reward.
However, if your goal is long-term reliability, zero maintenance, and maximum protection for your electronics without spending 15 hours in a sawdust-filled garage, the professional enclosure remains the superior path.
The Real Cost of DIY: A Financial Breakdown
When calculating the true Total Cost of Ownership (TCO), including high-quality lumber, specialized hardware, sealants, and the value of your personal labor time, a DIY build frequently approaches or exceeds the cost of an engineered enclosure.
The primary motivation for building a wooden TV cabinet is almost always to save money. At first glance, wood seems cheap. However, building an outdoor structure that looks respectable and attempts to keep water out requires much more than a single sheet of cheap plywood.
Let us break down a realistic shopping list for a DIYer attempting to build a high-quality, front-opening cabinet for a 55-inch television.
The DIY Shopping List
-
The Shell: To prevent immediate rotting, you cannot use cheap interior MDF. You need exterior-grade or marine-grade plywood, or solid cedar boards. (Estimated Cost: $80 – $120)
-
The Hardware: You need heavy-duty, rust-resistant stainless steel hinges. If you want the front door to flip up and stay open, you need to purchase gas struts. Add in exterior-grade wood screws and lag bolts. (Estimated Cost: $50 – $80)
-
The Shield: A custom-cut sheet of acrylic (plexiglass) large enough to cover a 55-inch screen. (Estimated Cost: $60 – $90)
-
Weatherproofing: High-quality exterior primer, exterior paint or wood stain, marine-grade silicone sealant, and rubber weatherstripping for the door seams. (Estimated Cost: $40 – $60)
-
Ventilation: Basic PC fans and ventilation grilles to attempt to mitigate the heat trap. (Estimated Cost: $30 – $50)
Total DIY Materials Cost: Roughly $260 to $400.
The Outvion Comparison
For a 50-55″ television, an Outvion Basic or Pro enclosure offers a streamlined alternative.
-
Instead of spending $350 on raw materials and dedicating 10 to 15 hours of your weekend to measuring, cutting, painting, and waiting for sealants to dry, you are purchasing a finished product.
-
The Outvion enclosure arrives fully engineered with the VESA mounting system, the shatterproof polycarbonate shield, the active cooling fans, and the sealed cable exits already integrated into a sleek, modern design.
When you factor in the value of your personal time (even at a conservative $20 an hour for 10 hours of labor), the DIY route quickly becomes the more expensive and less reliable option.
True Cost Breakdown: DIY Wood Build vs. Engineered Enclosure
| Expense Category | DIY Wooden TV Cabinet (55″) | Outvion IP65 Enclosure (50-55″) |
| Structural Shell | Exterior/Marine Plywood ($80 – $120) | High-Density Polymer (Included) |
| Protective Screen | Acrylic / Plexiglass ($60 – $90) | Polycarbonate with 99% UV Blocking (Included) |
| Hardware & Mounts | Hinges, Gas Struts, Screws ($50 – $80) | Integrated VESA Mounting System (Included) |
| Weatherproofing | Primer, Paint, Silicone Caulk ($40 – $60) | IP65-Rated Labyrinth Seal (Included) |
| Personal Labor Time | 10 to 15+ Hours (Measuring, cutting, painting) | Under 1 Hour (Standard wall mounting) |
| Long-Term Risk | High (Wood warping breaks silicone seals) | Low (Dimensionally stable, sealed cable exits) |
| Estimated Upfront Cost | $230 – $350+ (plus a lost weekend) | Transparent Upfront Pricing |
Step-by-Step: The Installation Reality
Deploying an Outvion enclosure involves straightforward wall-mounting and sliding the TV into place, typically taking less than an hour, whereas a DIY build requires extensive construction, sealing, and curing time.
If you are handy enough to confidently operate a table saw, a router, and a drill to build a custom cabinet, installing an Outvion enclosure will be the easiest project you tackle all year. The system is designed for straightforward deployment by both AV professionals and capable homeowners.
The DIY Construction Timeline
Building a respectable wooden cabinet is a multi-day process:
-
Design and Measure: Calculating internal clearances for the TV and the mount.
-
Cutting and Assembly: Operating heavy saws, gluing joints, and driving screws.
-
Finishing: Sanding the wood, applying a layer of primer, waiting for it to dry, applying exterior paint, and waiting again.
-
Hardware Installation: Routing out spaces for hinges, attaching gas struts, and carefully securing the brittle acrylic window without cracking it.
-
Mounting: Attempting to lift a heavy, awkward wooden box onto the wall and securing it safely.
The Outvion Deployment Process
Installing an Outvion enclosure is significantly more efficient:
-
Mount the Shell: You bolt the lightweight, empty rear shell of the Outvion enclosure directly to the wooden studs or brick on your patio wall using standard heavy-duty lag bolts.
-
Attach the TV: You attach the vertical VESA mounting arms (included) to the back of your indoor television.
-
Drop and Lock: You lift the television and simply hook it onto the internal rails of the mounted Outvion shell.
-
Route Cables: You run your power and HDMI cables down through the integrated sealed cable exit at the bottom.
-
Close the Lid: You close the front cover and lock it.
The entire process typically takes less than an hour from unboxing to watching the game. Furthermore, if your TV ever fails or you want to upgrade to a newer model, you simply open the Outvion box, unhook the old TV, and drop the new one in. You do not have to rebuild a custom-sized wooden cabinet to fit a new television’s dimensions.
Conclusion & Final Verdict: Stop Guessing with Plywood
To make the most informed decision for your patio, you must objectively evaluate the material science, the true total cost, and your own long-term goals.
Material Science Comparison: DIY Wood vs. Outvion Polycarbonate
| Feature | DIY Wooden Cabinet | Outvion Polycarbonate Enclosure |
| Heat Management | Poor (Wood acts as a thermal insulator) | Better (Active 2/4 fan ventilation options) |
| Front Shield | Acrylic (Prone to shattering upon impact) | Polycarbonate (Extreme impact resistance + 99% UV blocking) |
| Moisture Defense | Relies on caulk; joints expand/contract | IP65-rated design with sealed cable exits |
| Installation Time | 10 – 15+ Hours (Multi-day project) | Under 1 Hour (Standard VESA mounting) |
| Aesthetic | Bulky, rustic, requires regular repainting | Sleek, modern, requires minimal maintenance |
If you are a passionate woodworker building a setup for a deeply shaded, highly protected porch, a custom DIY cabinet can be a rewarding personal project. However, if your TV will be exposed to fluctuating temperatures, high humidity, or potential physical impacts, relying on plywood and silicone caulk is a high-risk gamble with your electronics.
By investing in an Outvion IP65 Enclosure, you are choosing an engineered solution designed for a long outdoor service life. You protect your electronics from thermal strain, save yourself a weekend of laborious construction, and ensure your patio looks professional and clean from day one.
There is a time and place for carpentry. If you want to build a beautiful harvest table for your patio, go for it. Wood is perfect for that.
But when it comes to protecting high-voltage electronics from rain, heat, and bugs, wood is simply the wrong tool for the job. The physics of insulation, the chemistry of moisture absorption, and the mechanics of weight all work against you.
Don’t risk destroying a $500 – 1,000 TV just to save $50 on a cabinet shell. Save your weekend for watching the game, not sawing lumber.
Before You Buy That Plywood: The DIY vs. Enclosure Q&A
1. Can I use marine-grade plywood to build a TV box?
Yes, but it only solves half the problem. Marine-grade plywood is excellent at resisting wood rot and delamination in wet environments because of the waterproof glues used in its construction. However, it is still a dense wood product. It will still act as a thermal insulator, trapping the television’s internal heat and significantly increasing the risk of overheating during the summer months.
2. Will a DIY wooden box keep out bugs?
Usually not. To vent the heat trapped by the wood, DIYers must cut holes. Even if you place mesh over these holes, the natural expansion and contraction of the wood over the seasons will often cause the joints and caulk lines to pull apart slightly. These microscopic gaps create entryways for insects like spiders and wasps, which actively seek out the warmth of the television’s power supply.
3. Is plexiglass strong enough to protect the TV screen?
It depends on the threat. Plexiglass (acrylic) will stop light, glancing debris like blowing leaves. However, because it is a brittle material, it will shatter under heavy, direct kinetic impact (like a thrown baseball or a falling branch). Outvion utilizes Polycarbonate because it is designed to flex and absorb severe impacts without shattering, offering superior physical protection for the screen behind it.
4. Can I just paint the wood with waterproofing sealant?
Yes, but it requires ongoing maintenance. Liquid waterproofing sealants and exterior paints are necessary for a DIY build, but they degrade under harsh outdoor weathering and UV exposure. You will need to inspect, sand, and reapply the sealant every year or two to maintain protection. Professional polymer enclosures do not require painting or resealing.
5. Does the Outvion enclosure fit curved TVs?
Yes. The Outvion enclosure features a generous internal depth profile and fully adjustable VESA mounting brackets. This deep internal cavity accommodates the structural geometry of most curved displays, as well as the thicker chassis of older flat-screen televisions, holding them securely behind the front polycarbonate shield.
Recommended Technical Reading & Resources
To further understand the engineering principles discussed in this guide, we recommend reviewing the following material science and industry standards:
-
Thermal Properties of Wood: Understanding Thermal Conductivity and Insulation (Engineering ToolBox)
-
Why it matters: Explores the thermodynamic physics of wood and explains why building closed wooden structures around heat-generating electronics leads to rapid thermal strain.
-
-
Plastics & Material Science: Polycarbonate vs. Acrylic: Material Comparison (Curbell Plastics)
-
Why it matters: A technical breakdown of why polycarbonate yields and absorbs kinetic energy, making it the mandated choice for shatterproof safety barriers compared to brittle acrylics.
-
-
Ingress Protection Standards: IEC 60529: Degrees of Protection Provided by Enclosures (IP Code)
-
Why it matters: The official international engineering standard defining exactly what constitutes “dust-tight” and “water jet resistant” protection for electronic enclosures.
-